


Most mountain rescue incidents are caused by poor navigational skills, an inability to read the terrain and navigate without a compass or attempting to do so with inappropriate navigational equipment. Former SAS man Phil Campion says what to do if you’re lost without a map or a compass.
Each year, hiking groups get lost and disorientated because they don’t know how to navigate without a compass, or at all, and haven’t planned ahead. Once you’re lost, there’s a serious risk of exhaustion, which can lead to dehydration, hypothermia or death. Navigation is both a skill and an art that needs to be learnt and practised.
Unlike cities full of landmarks and street signs, in rural areas, featureless fields, moors and forests dominate, making it difficult to get your bearings. If you’re serious about navigating, sign up to a course that will teach you properly how to use a map and a compass. Here’s what to do if you find yourself stranded and need to navigate without a compass or a map – my ‘bare essentials’ navigation.
Using a watch as a compass
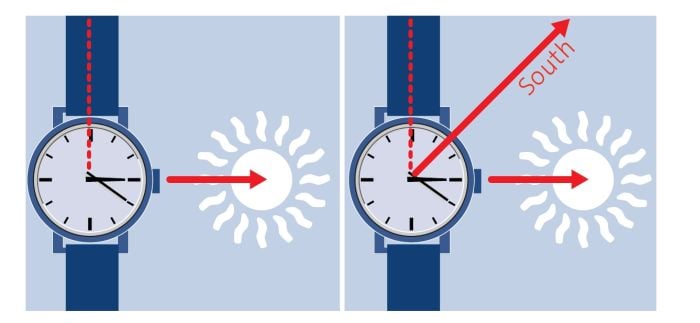
You can easily navigate without a compass, as long as you have a watch. If it’s sunny and you have a watch with hands, or if you know the time and have a pen and paper to draw one, you can always locate south. Aim the hour hand of the watch at the sun. From the centre of the watch, draw an imaginary line to where 12 o’clock sits on the watch’s face. You now have a segment from the hour hand to 12 o’clock. Divide this segment into two equal parts and you’ll find that the line bisecting the two parts points south.
For south of the tropics, point 12 o’clock at the sun. North bisects the angle between 12 o’clock and the hour hand.
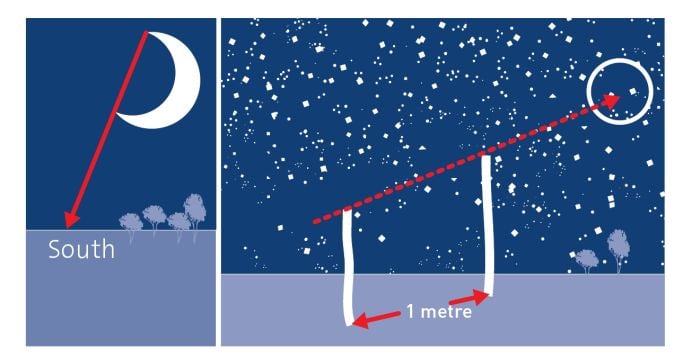
At night you can use the moon during its crescent phase – the stage between a new moon and a full moon. Draw an imaginary line from the point of each side of the crescent and continue down until it reaches the earth. The point at the bottom signals south.
Improvisations to navigate without a compass
By looking at the stars, you can use the movement of the earth to help you determine which direction you’re facing in order to navigate without a compass. Fix your eyes on two distant points, such as two trees, or find two sticks, one slightly longer than the other. Insert the sticks upright in the ground, the longer one a metre in front of the first. Line up any star with the tops of the sticks or trees and wait until it appears to have moved.
● If the star moves to the left, then you’re facing north.
● If the star moves to the right, then you’re facing south.
● If the star rises upwards, then you’re facing east.
● If the star moves downwards, then you’re facing west.
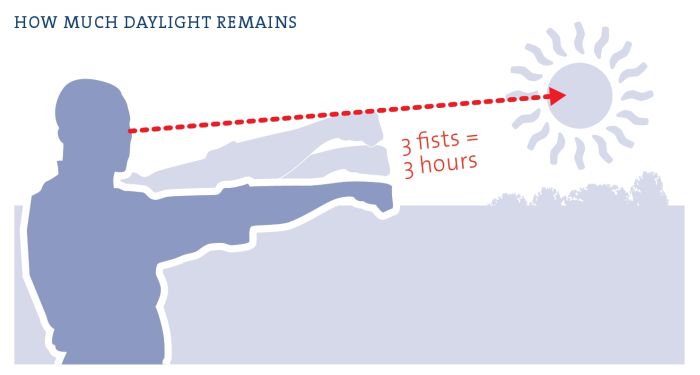
Knowing how much daylight you have left
If you’re in any kind of emergency situation, it’s useful to know how much daylight you have left. Some methods to navigate without a compass rely on sunlight. Here’s one method which works using your fist:
● Locate the sun’s position in the sky and face towards it.
● Hold one arm out straight in front of you and make a fist in the direction of the sun, but lining the base of your wrist with the horizon.
● Make a fist with your other hand and place this fist over the first. Move the first fist up on top of the second and continue until you reach the sun. Each fist equals one hour, so, if you counted three, you have three hours until sundown.
 Making a trail map
Take a pen and notepad to make a trail map, noting down the terrain, any landmarks or anything unusual that you would recognise again: ponds, odd-shaped trees, logs or rocks. This can help you retrace your steps, if you get lost and need to navigate without a compass.
Navigating when you’re lost: pacing
So many people go round in circles when they’re lost on foot. This method will enable you to search in all four directions and hopefully find help along the way.
● Before you get into a situation, find out how many normal paces you take to 100 metres (one pace is a double step: left and right). For me, it is around 62. Use a football pitch and count your paces from one goal to the other.
● From your starting point, choose a direction and walk 400 metres, counting your paces as you go. For me, that would be 248. If you’re going uphill, you’ll shorten your pace, downhill it will lengthen.
● Look for any signs of a path or road, agricultural land, or a house – even a fence – that could lead you to help.
● Return to your starting point by counting your steps back and then do the same in the other three directions, until you find assistance.
Signalling and search and rescue
In an ideal world, we’d all have personal locator beacons alerting the nearest search-and-rescue team as soon as we were in trouble, but in reality disasters often happen when we’re least prepared. That’s when improvisation becomes our best friend. Before any journey, ensure that you have a friend or family member primed to request help if you don’t arrive or call as planned. Remember, time is the enemy in any survival situation: the longer it takes to alert people to your situation, the lower your chances of survival.
The art of signalling
There are three types of signalling device. Each have their place and you can never have too many, as long as they achieve the desired result of someone coming to rescue you.
Automatic signalling devices
These include devices that will transmit your details to the rescue services, usually for a minimum of 24 hours, some infinitely until turned off.
Personal beacon locator: Connected to a network of satellites across the world, once activated, they send out a distress signal transmitting exactly where you are to search-and-rescue control stations who operate 24/7. Always ensure that the device is vertical and there is nothing around you to block the signal. Face south, if you can, to enable a quick transmission to the satellites.
Manual signalling devices
These include signals that rely on the survivor operating them, but they usually have an infinite length of life, so can be used again and again:
Whistle: A whistle uses a lot less energy than yelling for help and produces a loud, penetrating sound that travels further, especially in windy conditions. If you’re in trouble, give six good blasts of a whistle and wait one minute before repeating. Continue until someone finds you. The recognised international distress calls are based on groups of six in the UK and Europe and three in the US.
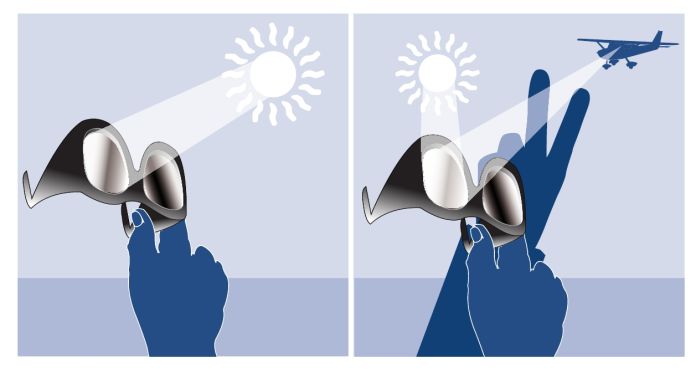
Mirror: Use any shiny reflective surface, like metallic sunglasses, jewellery or a belt buckle. Aim for high ground and, when you see an aircraft, hold the mirror towards the sun and tilt it so that you get a beam of light reflecting off it. With your other hand, separate your forefinger and second finger to shape a V (the sign for help) and aim towards the aircraft with the beam of light through your fingers. Be careful not to flash the mirror for more than a few seconds at a time, as it could temporarily blind the pilot.
Torch: Deliver the traditional SOS signal by turning it on and off to give three short bursts of light, followed by three long bursts of light, followed by three short bursts of light.
Brightly coloured clothing: If you can find a clearing and have enough clothing for the task, lay them out to spell ‘SOS.’
Short-lived devices
These are the least effective of all the types of signals because they rely on rescuers being in the right place at the right time and actually seeing the signal:
Fire: Darkness is the best time to light a fire for signalling purposes. Find a clearing that can be easily seen from the sky. If in snow, you may have to clear an area. Ideally, build three fires, either in a triangle (the international distress signal) or in a straight line with approximately 20 metres between them. Alternatively, you could burn a tree, but be careful that it is isolated in case others nearby catch light and the whole forest goes up in smoke.
Smoke: In daylight, smoke is more effective than fire. Try and aim for three areas of smoke. Coloured smoke is more easily seen. Green leaves or some water will produce white smoke, pine branches will give off thick smoke, while oil-soaked rags or rubber will produce black smoke.
This article is an extract from Phil’s book Big Phil Campion’s Real World SAS Survival Guide. It costs £14.99, see www.quercusbooks.co.uk.
Intro photo: Kris Williams